keywords: aluminium, tin-lead solder, soldering, metalurgical bonds, soldering copper to aluminium, no longer impossible ,electrical bonds
breaching aluminium oxide spontaneous passivation layer.
abstract: conventional wisdom states that it is impossible to solder to aluminium. A method is presented to permit the easy soldering of copper directly to an aluminium substrate that is readily reproducible be persons with basic metalworking skills using only a propane torch, using "Alumalloy Braze" and conventional resin flux 60/40 Pb/Sn solder.
by Ralph Klimek VK3ZZC February 2011, copyleft
My interest in this technique stems from my Ham Radio interests. I have often wanted to make good electrical bonds to aluminium metal antenna elements and have been thwarted by the uncompromising chemistry of the elements and the metal. A pressure bond up to now has been only real possibility and those with experience learn the hard way that a pressure bond lasts for only a couple of weeks when exposed to the weather. An antenna that performed well just after it left the workshop becomes increasingly unsatisfactory after only a few weeks exposure. And this despite weather shielding the connections and even passivating the junctions with silicone resin. A simple pressure bond may conduct DC current but the RF AC conductance can be very low.
Aluminium antenna designs are often limited by the difficulty of performing a metal joining operation where the RF impedance is low, for example at the centre junction of groundplane antenna or at the centre of a dipole element. There then follows the very real difficulty in terminating the copper coaxial conductors onto an aluminium driven element. Those with experience know too well the corrosive effect of two dissimilar metals exposed to weather. The feed point impedance of a driven element in a multi element yagi array is of the order of five ohms or less and I suspect that many of my failed antennas were merely defective only at this feedpoint.
For RF conductivity, the only true options are all copper elements permitting well soldered , low impedance joints; at the cost of heavy weight and monetary cost. My most successfull yagi antennas all had copper driven elements. If only it were possible to make a true metalurgical bond to aluminium at moderate temperature that would be compatible with copper.
It is possible, sometimes, and with exotic alloy solders and exotic fluxes. Aluminium soldering is nothing new, however, manufactures keep their methods to themselves and makers of the solders will not release usage notes. Here I present a highly reproducible method that a competent Radio Ham can replicate using only a simple and inexpensive propane gas torch.
The method requires the use of a now commonly sold aluminium brazing rod. This rod is made under the trade name Alumalloy and sold in the United States under the name Durafix. It , I believe, is a ternary alloy made from aluminium, copper and magnesium with a melting point of 430 degrees C. It has been available under various trade names in Australia for a number of years, it is known here in Oz as " aluminium rubbing solder". There is absolutely no application information published about it. (conspiracy theories welcomed here!) I have recently learned how to apply this remarkable alloy to make aluminium to aluminium brazed joints, after watching some Youtube videos. Search Youtube for the term "Alumalloy" and see for yourself. I have used it with success to make some antenna elements with it. Only the next step remained....bonding copper conductors to my aluminium antenna elements.
To understand the method, you should be familiar with the surface chemistry of Aluminuim. Element 13 is one of the most electropositive of the metallic elements. The reaction between Al and Oxygen is one of the most exothermic reactions known and forms the chemical basis of the Thermite method of welding steel and powers the Space Shuttle solid rocket boosters which burn Al powder and Ammonium Perchlorate. What prevents your Al kitchen utensils and Al foil from spontaneously bursting into flame ? ( and incinerating your dinner )
When bare Al is exposed to the atmosphere , it immediately reacts with Oxygen and forms an oxide layer on the surface. This oxide layer is normally only a few atoms thick. The oxide is very tough, and binds very strongly to the metal surface. Aluminiun Oxide is the chemical basis of hard abrasives, Ruby, Saphire and integrated circuit substrates. Thicker layers of the oxide can be artificially grown in a process called anodising. The oxide layer totally passivates the metal surface from further oxidative attack under normal atmospheric conditions. The oxide is soluble in most mineral acids and strong alkalis. It is this oxide monolayer that prevents the wetting of solder and conventional brazes. This monolayer can be mechanically breached and a direct metal-metal bond formed provided that oxygen can be briefly excluded or actively scanvenged.
A pressure bond to the surface of Al metal is really an oxide sandwich. The oxide is very thin so a moderate amount of pressure can get the electrode close enough to the Al base metal so that electron tunneling occurs through the oxide monolayer. Perhaps when the pressure bond is new, the oxide is breached and this permits a good electrical connection. After a while, oxygen must penetrate into the bond and slowly seperate the electrode from the base metal. This is why , as myself and countless radio amatuears have discovered, their newly minted yagi array quickly deteriorates once put out of reach up on your tower.
The technique.
The Alumalloy braze melts at about 430 degress C, pure Al and its common alloys at about 700 degress. 400 degrees is well within the power of a propane torch, but utterly beyond the upper range of a soldering iron.
Heat the base metal from below. Touch the brazing rod to the base metal. Do not heat the brazing rod directly with the torch...it will just melt and oxidise.
When the metal is at the right temperature the braze will begin to melt. As it melts rub the base metal with the rod. This breaches the oxide monolayer and permits an instant metal-metal bond to form under the molten surface. The Oxide monolayer is unstable on the brazed surface and liquid braze will literally burrow underneath it. Rub the molten braze bead with a stainless steel knife and "tin" the surface of the base metal. The purpose of rubbing with the steel blade is to breach large areas of the oxide layer under the braze melt. Continous heating is required while you are doing this. The initial bead of molten braze will not wet the Alumium surface untill that surface is scratched UNDER the bead. The molten bead temporarily excludes atmospheric oxygen and only then will it bond with the base metal.
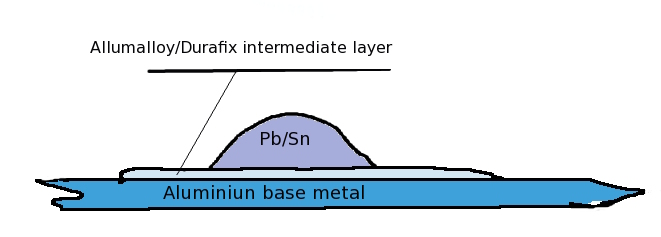
Wipe the layer of oxidised dross with the knife blade away from the brazed surface and allow to cool. Reheat from below. Apply conventional 60/40 lead-tin resin fluxed solder to the brazed surface and do not overheat or permit the resin flux to burn. A perfectly formed solder bead will form ! Allow a large bead to form on the surface and cool. Your copper conducter can now be reflow soldered to this surface. At this point a very heavy 100W iron may have enough power , gas is better because of the very high thermal conductivity of Aluminum metal. A perfect copper to aluminum solder bond is thus made.
The base metal should be prepared by filing to bare metal with a very fine bastard file to produce the smoothest surface possible. Polish with a FINE wire brush, a suede fabric brush is what is really needed here. If the surface has been anodised, this must be completely abraded away to bare metal.
Why does this work and how does Alumalloy braze work ?
Alumalloy does not require a flux ! It took me a while to appreciate this fact as it flies in the face of common sense and convention. The braze is an alloy of aluminum, copper and magnesium and maybe other undisclosed metals. I beleive that the purpose of the magnesium in the braze performs the function of oxygen scavanger. Under this melt, a breached Al surface will bond directly and the magnesium prevents the dynamic formation of fresh Al Oxide monolayer by competing with Al for dissolved Oxygen in the melt. The magnesium is the flux ! I do not know this for a fact, it is only my educated guess. However, it is true that Magnesium has great affinity for oxygen and unlike aluminium, the magnesium oxide is not strongly bound to the metalic surface. Maybe a high copper component is what makes this stuff solderable, I do not know. I do not have the ways and means of chemically analysing it, maybe someone out there does.
I am flabbergasted that standard electrical Pb-Sn solder is compatible with the brazed surface , this was not expected and I found this only by experiment.
Do not just take my word for it, try it yourself.
Alumalloy is available in Australia, retail. I bought mine at Bunnings where it is sold as Bernzomatic Aluminium Brazing rods. It is very expensive, 2 little rods cost AUS $10. It comes with absolutely no application advice. Maybe you have bought some and discarded it in disgust because it " does not work "? Believe me ,it does work but only with the right technique as described. The observation that the braze is compatible with standard electrical solder comes to me , and I suspect the rest of the Ham world, as a complete and welcome surprise!
| examples of some recently made objects with Alumalloy and Sn/Pb solder | ||
 |  |  |
| top hat loading element for my new 160 meter short vertical antenna | copper conductors soldered to Aluminium ! | |
 |  |  |
| copper conductors soldered to Aluminium ! | Al to Al brazed joint | copper conductors soldered to Aluminium ! |
 |  |  |
| electrode brazed to my Al 50mm tube vertical element | the electrode can now be soldered to ! | copper conductors soldered to Aluminium ! |
 |  |  |
| copper conductors soldered to Aluminium ! | Al to Al brazed joint | Al to Al brazed joint. Not a MIG joint! |
 |  | blank |
just a lead tin solder bead on bare Al this is not supposed to be possible ! Note, this is not reliable. The solder bead will spontaneously seperate itself in a few weeks. | Al to Al brazed joint | parasitic elements electrically bonded to boom by brazing. Why bother ? This is an extremely low impedance point and any resistance here kills Yagi performance . This yagi was specifically designed for parasitic elements electrically to be bonded to boom |
The continued quest to find a good way to electrically bond to weather exposed aluminium elements I recently found a sheet of light gauge stainless sheet during some recent dumpster diving. I am interested in answering the question as to whether aluminium and stainless steel would form a bimetalic couple when exposed to the ambient weather. Could I fabricate some fittings from stainless steel that would be sensibly corrosion resistant.? The image below shows some of my results. stainless steel can be cut, drilled and formed with some difficulty but the good results make it well worth ones time to master the art of working stainless steel. There is no sign (yet) of white powder forming in the aluminium to stainless steel joint. This has the potential for long term application on my antennas out of reach on my high sticks. Now then, how to attach a copper conductor ? It is not generally possible to soft solder stainless steel. There are some generally unobtainable soft solders that will bond to stainless steel. There is no force on earth or simple flux that will allow standard 60/40 SnPb solder to bond. Stainless steel can be easily brazed with 2% ( 5% is better) Silver brazing and moderate heat. The braze IS compatible with 60/40 SnPb solder. Problem solved. Even better then, braze a bit of 1/4inch hydraulic copper pipe and use it to form a very solderable electrode cup for your coax connections. The copper pots are held down with some copper wire scraps during the brazing process. CUT stainless steel with angle grinder and purpose made stainless steel cutting disks. These will carry the designation INOX. You can also use a very heavy tin snips with some care and brute strength. DRILL stainless steel , first with a new 1/8 inch cobalt drill pilot hole, then enlarge. The special secret method of drilling stainless steel is to use moderate speed and moderate to heavy drill pressure. Keep things going, never hesitate and keep things cool. Do not drill free hand, IT JUST DOES NOT WORK ! Use a drill press. Provide an aluminium backing plate to the work piece. This helps the drill to completely penetrate and prevents the stainless steel from deforming and work hardening around the rotating drill bit. Drill bits in stainless steel do not last very long. You have to consider them consumeables or you become skilled in the fine art of re-sharpening them. A high speed steel new drill bit will have a lifetime of only 3 holes in stainless steel ! Cobalt steel may last up to 12 holes . . . . Deal with it. FORM stainless steel , over a mandrel that is a little thinner than the aluminium tube. This can be done with a heavy duty vice and standard drill bits. You will have to experiment a bit to find the right mandrel. Dont use a 12mm mandrel for 12mm tubing, your fitting will not "bite". The next imperial size down is about right. |
 |
Postscripts
- Did you know that is was possible to make poor quality standard 60/40 solder bonds directly to Aluminium ? Melt solder on Al while scratching under the solder bead. Some bonding occurs; do take too long, oxygen dissolved in the molten solder will quickly react and the solder bead will no longer bind. It just barely works and I would not rely on a bond like this. The bead will spontaneously fall off the base metal after a few weeks, even though initially it appears to be strongly bound. Why ? I believe the instability of this joint is due to atmospheric oxygen that dissolves into the moltern lead tin alloy. After about 2 weeks this oxygen diffuses through the the solid solder to the aluminium layer where it reacts directly and this reaction releases the solder bead. I wonder if a ternary alloy of lead-tin-zinc might work. The zinc would act as an oxygen scanvenger in the solidified bead. Remember that metals are not totally impervious to gas. A chemically reactive gas will diffuse through solid metal, albeit, very slowly at room temperature.
- things
to try. Will enough Magnesium dissolve in Pb/Sn solder to behave as an
oxygen scanvenger and permit direct solder to al base metal junctions ?
Discuss. How about Titanium ?
- Alumalloy braze will also bind well to the metal of die cast boxes and other die cast objects. Hams, solder directly to your die cast box projects! Die cast metal or "pot metal" is a variable alloy made from shop-floor-sweepings, zinc, magnesium, aluminium and a hint of copper.
- Alumalloy is available in the United States for " six dollars a pound ", according to the Youtube infomercial. Someone should be importing this by the shipping container load into Australia.
homepage

page created Tue Feb 1 17:36:45 EST 2011