Designed using a maximised window at 1024x768 screen resolution
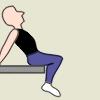
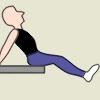
| Position at start, frame 1 | Swing up at frame 9 | Position at end (copy of position at start), frame 18 |
|
|
|
|
||
We're going to take these keyframes and change their interpolation, and view the effect it has on the resulting animation.
Note : In this small format and simple animation the differences may be a little subtle and difficult to see. I should really try and get some better examples.
Keyframe interpolation modes in Moho |
||
StepImmediate transition from one keyframe to anotheruseful for e.g. camera cuts (i.e. layer movements) |
 |
 |
LinearDirect movement from one keyframe to the next, not allowing for any "cushioning" of the movementuseful for robotic or mechanical movement |
 |
 |
Smooth (default)Movement somewhat "cushioned" between keyframesUseful for smooth flowing movement between keyframes, good for "intermediate" keyframes |
 |
 |
Ease In/OutMovement "cushioned"Useful for "extreme" keyframes, when changing the direction of movement |
 |
 |
NoisyShuddery jerky movement between keyframesNot quite as controlled as a manually animated "stagger", but useful in similar situations |
 |
 |