[HTML] [Images]
Image Preparation
- Important Matters:
- scanning, colour balance, contrast
- image size, cropping
- processing the image
|
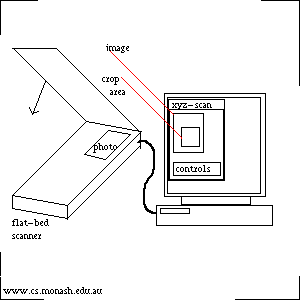
Photographs and drawings are input
with a flat-bed scanner.
The program that controls the scanner,
e.g. deskscan,
will have a number of controls
for the input image type,
the processed image-file format,
image size,
colour and contrast etc.
Image dimensions are either expressed in mm and cm (or inches)
or in terms of the number of pixels.
Also important is the scanning resolution,
often 72dpi (dots per inch), but sometimes much higher.
Given any two of dimension, pixels and resolution,
the third quantity can be determined.
(High quality magazine images are at several hundred dpi.)
- Image Type:
- Line Art - just two "colours"
usually black and white, drawings, blue-prints etc.
- Grey Scale - the levels of grey from black through to white,
e.g. black and white photograph.
- Colour Photograph - like it says.
- Number of Colours:
- Hundreds of colours - generally 256 = 28.
- Thousands of colours - generally 216 ~64K.
- Millions of colours - generally 224 ~16M.
- Image File Format:
- `gif' - uses a colour-table of up to 256=28 colours.
Most line-art and poster-art on the 'net is in gif format
because it is efficient for such pictures.
- `jpg' - a "lossy" compression method
giving good quality and compression of 24-bit colour photographs
(and other photographs).
- `rgb' - Red, Green and Blue, usually 8-bits each, ie 24 bits in total.
224~16M, hence millions of colours,
no compression.
- tif - can store rgb images, not much compression.
When processing a photograph for inclusion in a web page,
consider the size of the photograph,
the part of it to be included in the web page,
and the size of the final image in the web page.
It is most convenient to think of the size of the final image in numbers
of pixels, e.g. 300x300 (above right).
Most current computer graphic screens have between 72dpi and 100dpi,
ie. 300x300 is probably between 3" and 4" square on your screen.
An HTML image size can also be specified as a percentage of the page width
but you still need to scan it at an appropriate level of resolution.
The scanner may be set to show the image dimensions on mm, cm or inches,
but there will be a way (e.g. under custom) to show pixels.
Every time an image is manipulated, some quality is liable to be lost.
So if in doubt, scan the image at greater resolution and higher quality than
you will finally need, perform all the processing and
shrink it in size (also any compression) as the final step.
A caveat to this is that any lines and text in the image
might thin away to nothing when it is shrunk.
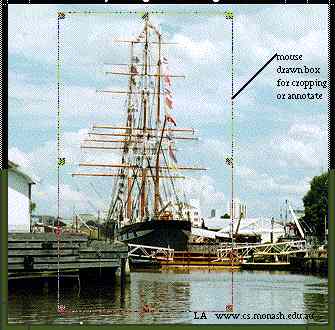
The mouse can be used to outline a selected area,
or cropping rectangle of the image.
Only this area will be copied into the image file.
Most photographs have far too much background
and here is your opportunity to crop much of it out.
The scanner program may also be able to zoom in
on this region.
An automatic control can set
the luminance (brightness) and contrast.
Manual controls can also be used.
e.g. A dark object on a light background may need lightening.
Under-exposed (dark) photographs are difficult to deal with
as they have little contrast or detail.
Perform only the first, rough cropping and editing of the
image with the scanner.
Do any more advanced operations with a more sophisticated
image manipulation program,
e.g. xpaint, xv, photoshop, brand-X-draw.
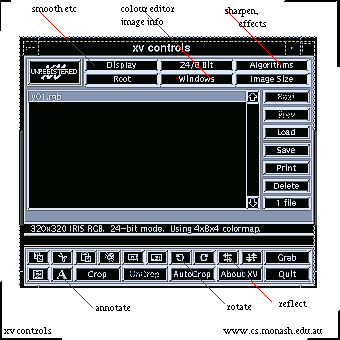
xv
xv is a widely used Unix X-windows program for basic image processing.
|
An image viewed with xv.
Clicking on the image (right button) brings up
the main control panel (below).
The mouse can be used to draw a box for cropping
or for adding text [A].
|
|
Main controls of xv.
[Algorithms] include sharpening (might bring stair-casing effects),
edge detect and various special effects.
[Windows] includes image information (cropping dimensions etc.)
and the colour editor.
[Save] can save the image in a great variety of file formats -
useful for converting between them.
|

|
Colour editor.
[Intensity] can, for example, be used to lighten shadows
in an under-exposed photograph.
The three colour-controls can be used to remove
a colour bias - use with care.
[Colour map] shows the colour table for a gif image
and can be used to change individual entries or to merge them
so as to reduce the number of entries (tedious).
|
Practicalities
The HTML designer has a dilemma.
It is natural to want to include a large number of big, high-quality images.
However image files are large (in kilo-bytes).
The HTML source of this entire page is 5Kbytes
but one compressed 300x300 image file derived from a colour photograph
can easily be four or five times larger.
Images look good but can take a long time to load.
Use gif for line-art and for posters with a small number of colours.
Use jpg for photographs and compress them as much as they will stand.
Copyright
Remember that the original artist automatically owns
the copyright of a photograph, painting or drawing.
You cannot scan it, process it or manipulate it,
even in another form, without the copyright holder's permission.
Copyright ©
L.Allison
Department of Computer Science, Monash University, Australia 3168
/ 1997